Overview
Visual Studio 2019 enables teams to validate architectural dependencies in their solutions using the Layer Designer, which first shipped in Visual Studio 2010. This feature helps ensure that developers respect the architectural constraints of the application as they edit their code. Developers now get real-time design feedback in the editor so they can immediately stop introducing architectural flaws. “Layer” diagrams have also been renamed “dependency validation” diagrams to make it clearer what they are for.
Related Resources
See this blog post for a detailed discussion comparing the live dependency validation experience with the past.
Prerequisites
In order to complete this lab you will need the Azure DevOps Server 2019 virtual machine provided by Microsoft. Click the button below to launch the virtual machine on the Microsoft Hands-on-Labs portal.
Alternatively, you can download the virtual machine from here.
Exercise 1: Real Time Dependency Validation in Visual Studio 2019
Task 1: Creating a dependency diagram
-
Log in as Sachin Raj (VSALM\Sachin). All user passwords are P2ssw0rd.
-
Launch Visual Studio from the taskbar.
-
Load the PartsUnlimited solution.

-
Press Ctrl+Shift+B to rebuild the solution.
-
Select Architecture | New Dependency Validation Diagram from the main menu.
-
Enter a Name of “PartsUnlimited.Dependencies” and click Create.

-
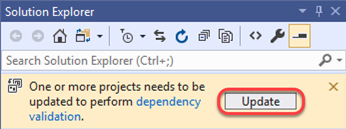
If asked to update projects to support dependency validation, click Update.
-
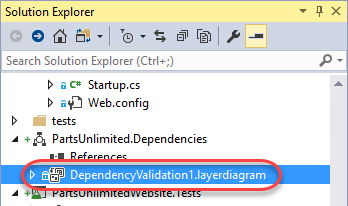
Note that the new project has been added to the solution. Double-click DependencyValidation1.layerdiagram to open it.
-
There are a lot of ways to add layers to the diagram, including from the Solution Explorer, Class View, and Object Browser.

-
In this case, we’re going to automatically generate a code map and then use that to codify our architecture via the diagram. Select Architecture | Generate Code Map for Solution. This code map will pull in everything it can about the project and represent it in a diagram so we can easily walk through the de facto dependencies and relationships each component (class, etc) has.
-
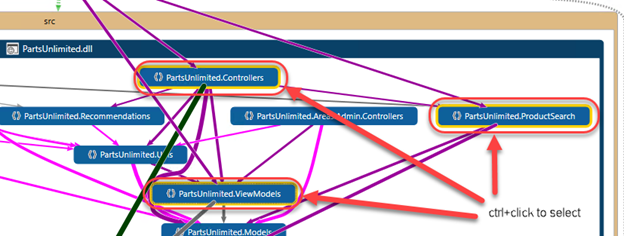
Expand the PartsUnlimited.dll component to see the namespaces it contains.
-
It gets a little messy at this point because we have lots of relationships and dependencies mapped across and within the project and its tests. Use Ctrl+Click to select PartsUnlimited.Controllers, PartsUnlimited.ViewModels, and PartsUnlimited.ProductSearch. Press Ctrl+C to copy them.
-
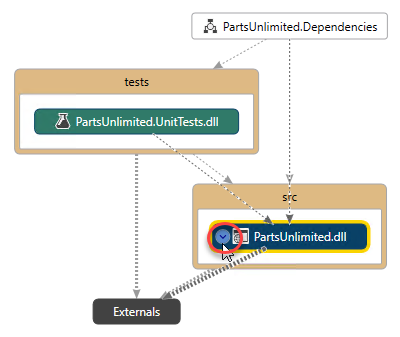
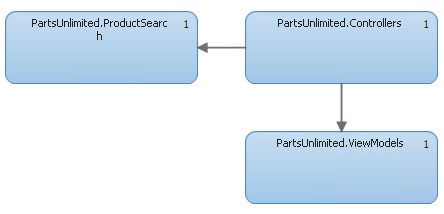
Switch back to the layer diagram and press Ctrl+V to paste the three components from the last step. You may want to rearrange them as shown below to make their relationships easier to understand. Put simply, the controllers namespace depends on the product search and viewmodel namespaces. While these relationships existed before and may have been unofficial while the project was being developed, putting them into the layer diagram makes them official architectural law moving forward.
-
It’s important to understand that the rules only exist for layers that exist on the diagram. For example, the Controllers namespace can reference the ProductSearch or ViewModels namespaces because their relationships are explicitly defined. At the same time, those two namespaces may not reference anything from the Controllers namespace because the dependency is directional (there are bidirectional dependencies available if two-way references are desired). ProductSearch and ViewModels may also not reference each other because they do not have an explicit dependency in the diagram. However, a namespace like PartsUnlimited.Utils is not used in the layer diagram and therefore is not enforced by the dependency validation engine. It may reference anything and anything may reference it. However, if it were added to the diagram, then all of its dependencies with every other layer in the diagram would be enforced.

-
Press Ctrl+S to save the diagram.
Task 2: Live dependency validation
-
Now it’s time to break some rules. Press Ctrl+Shift+B to rebuild the solution. It should build as expected because we haven’t violated any policy…yet.
-
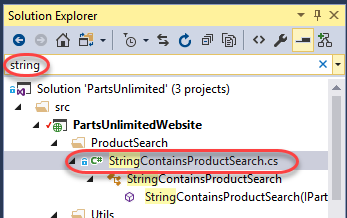
In Solution Explorer, search for “string” and open StringContainsProductSearch. This class is a member of the PartsUnlimited.ProductSearch namespace, and therefore is not allowed to reference anything from PartsUnlimited.ViewModels.
-
Locate the Search method. It currently returns a Task<IEnumerable<Product>>. Change it to return a Task<IEnumerable<ViewModels.ProductViewModel>>.

-
While this change introduces other errors as well, the key thing to focus on here is that the editor immediately provides a red squiggle indicating that this reference is not allowed based on its defined relationships. This live dependency validation provides immediate feedback to enforce architectural practices so that developers can feel confident that they’re following the project rules.

-
And even if the developer were to ignore the red squiggle, they would still be unable to build the solution due to error-level enforcement of the policy.

-
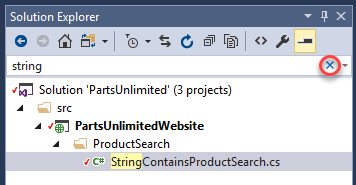
However, you can customize exactly how dependency rule violations are treated. In Solution Explorer, clear the search box.
-
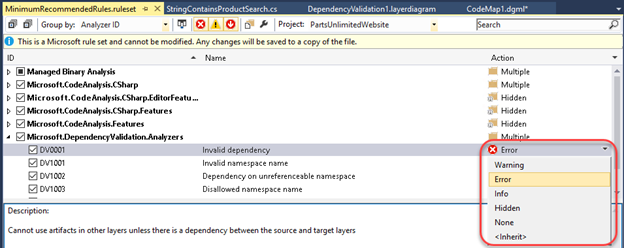
Under References, right-click Analyzers and select Open Active Rule Set.

-
Expand the Microsoft.DependencyValidation.Analyzers rule set and note how you could change the violation behavior from an Error to a Warning (or whatever you prefer). There is great flexibility in managing dependency validation.