Overview
Azure DevOps services helps teams modernize their application development lifecycle and go from idea to deployment with continuous integration, testing, and deployment for any app targeting any platform.
Azure DevOps services works with (m)any development tool including Visual Studio, Eclipse, IntelliJ, Android Studio, XCode, etc., to make it easy for developers to use Azure DevOps.
This lab will walk you through a typical end-to-end workflow for a Java developer using Azure DevOps and working with Eclipse. We will use a hypothetical customer called MyShuttle that provides a portal for its drivers to access travel history and see fares collected. This is a Java application built on JSP/Servlet technology running on Apache Tomcat and using MySQL as the database. We will develop this on a Ubuntu desktop station and we will deploy the app on Azure.
What’s covered in this lab
In this lab, you will
- Provision a Azure DevOps Organization team project with sample data and users
- Install Eclipse Photon and Team Explorer Everywhere, the Azure DevOps plug-in for Eclipse
- Install and explore Azure Toolkit for Eclipse
- Setup an Azure Build pipeline to build and test the code, then push it to a Azure Container Registry
- Setup an Azure Web app and configure an Azure Release pipeline to deploy the image to Azure Web App
Estimated time to complete the lab: 1 hour
Before you begin
-
Refer the Getting Started before you start following the exercises.
-
You will need to install and configure JDK, Eclipse on your Windows machine.
-
You will need the Docker Integration extension installed and enabled on your Azure DevOps Organization.
-
You will need to provision a team project with Azure DevOps Demo Generator. The template MyShuttle is used here.
Exercise 1: Setting up Eclipse
Having setup an Azure DevOps Organization project, we will now set up Eclipse.
-
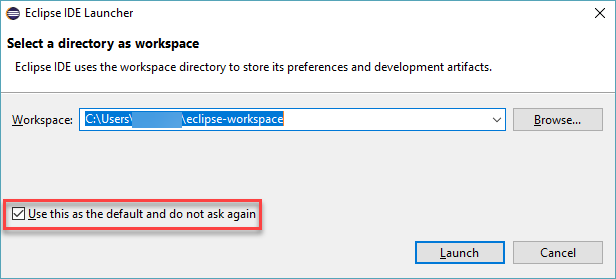
Open the Eclipse Java IDE. The first time you run Eclipse, it will prompt you to choose a workspace. Specify a folder and click the check box “Use this as the default and do not ask again” if you want Eclipse to use that as default and not prompt you again.
We will install Team Explorer Everywhere (TEE), the official plug-in for Eclipse from Microsoft to connect Azure DevOps and Azure DevOps Server with Eclipse-based IDE on any platform. It is supported on Linux, Mac OS X, and Windows and is compatible with IDEs that are based on Eclipse 4.2 to 4.6. We will also install Azure Toolkit for Eclipse. The Azure Toolkit for Eclipse provides templates and functionality that allow you to easily create, develop, test, and deploy cloud applications to Azure from the Eclipse development environment.
-
After Eclipse has started, select Help | Install New Software to bring the install dialog page
-
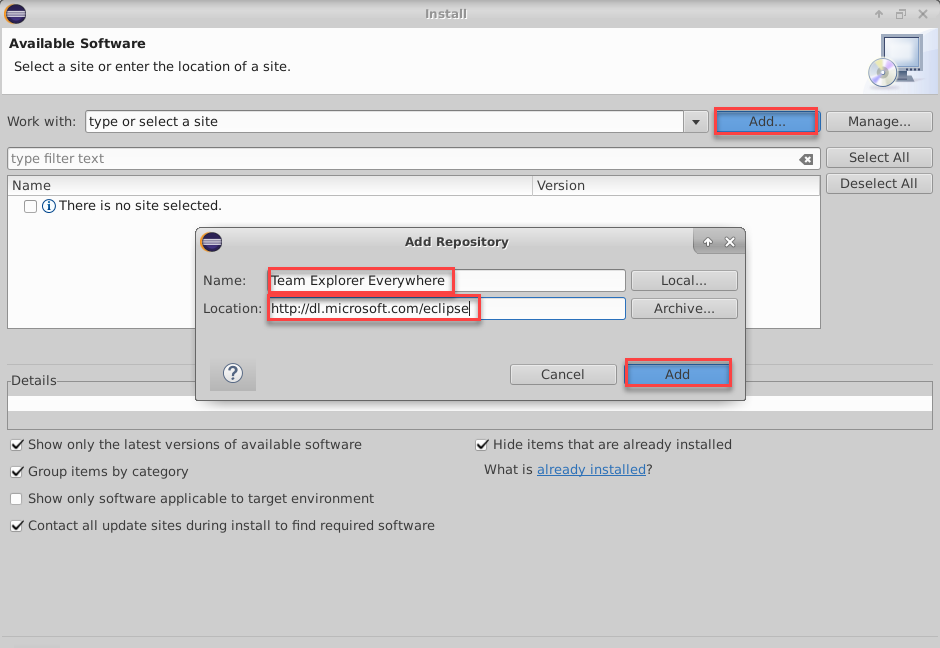
Choose the Add button to add a new repository. Add Team Explorer Everywhere for the name and specify http://dl.microsoft.com/eclipse for the location.
-
Click the Add button.
-
In the list of features in the Install dialog box, select the check box that corresponds to the Team Explorer Everywhere plugin and Azure Toolkit for Java.
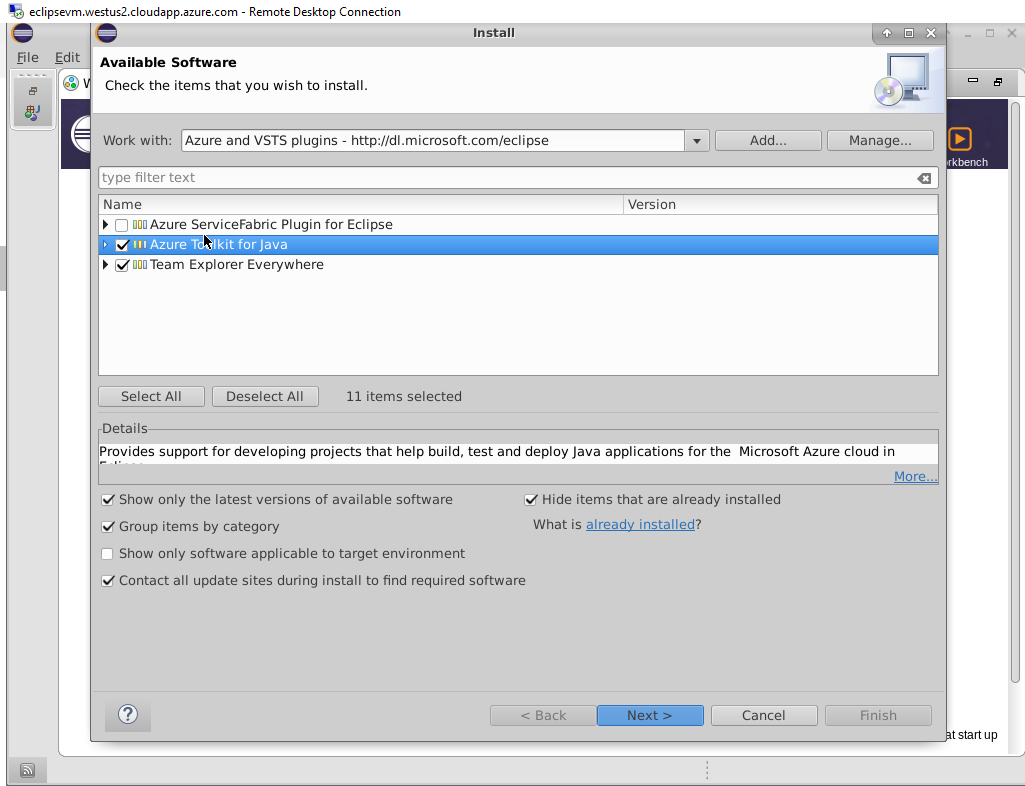 Note: If you don’t see this option, use the pull-down menu for “Work with:” and find the update site URL you just entered in the list and select it, then select the check box beside the plug-in mentioned above
.
-
Choose Next to follow the wizard, accept the terms and complete the installation.
-
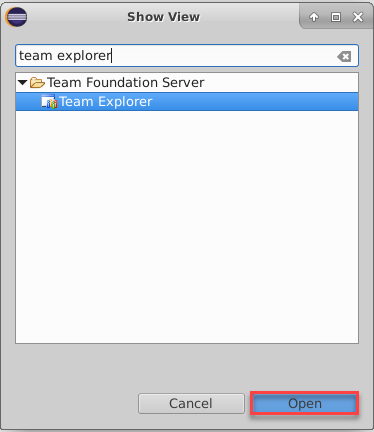
You might receive a pop-up to allow restart of Eclipse to apply the changes. Choose Restart Now. After Eclipse restarts, go to Windows > Show View and select Other…
-
Search for Team Explorer, select the Team Explorer View, and click Open.
-
From the Team Explorer view, click the link to Connect to a Team Foundation Server or Team Services account, then type in the name of the Azure DevOps Organization (
https://{your-account-name}.visualstudio.com) and press the Next button.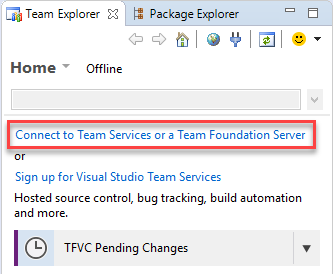
-
Choose the radio button next to “Connect to a Team Foundation Server or Azure DevOps Services account” then press the “Servers…” button. In the “Add/Remove Team Foundation Server” panel, click “Add…” and type in the name of the Azure DevOps organization (https://{your-account-name}.visualstudio.com) in the “Add Team Foundation Server” panel. Then press the OK button.
-
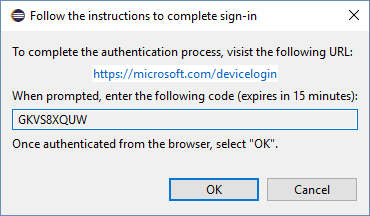
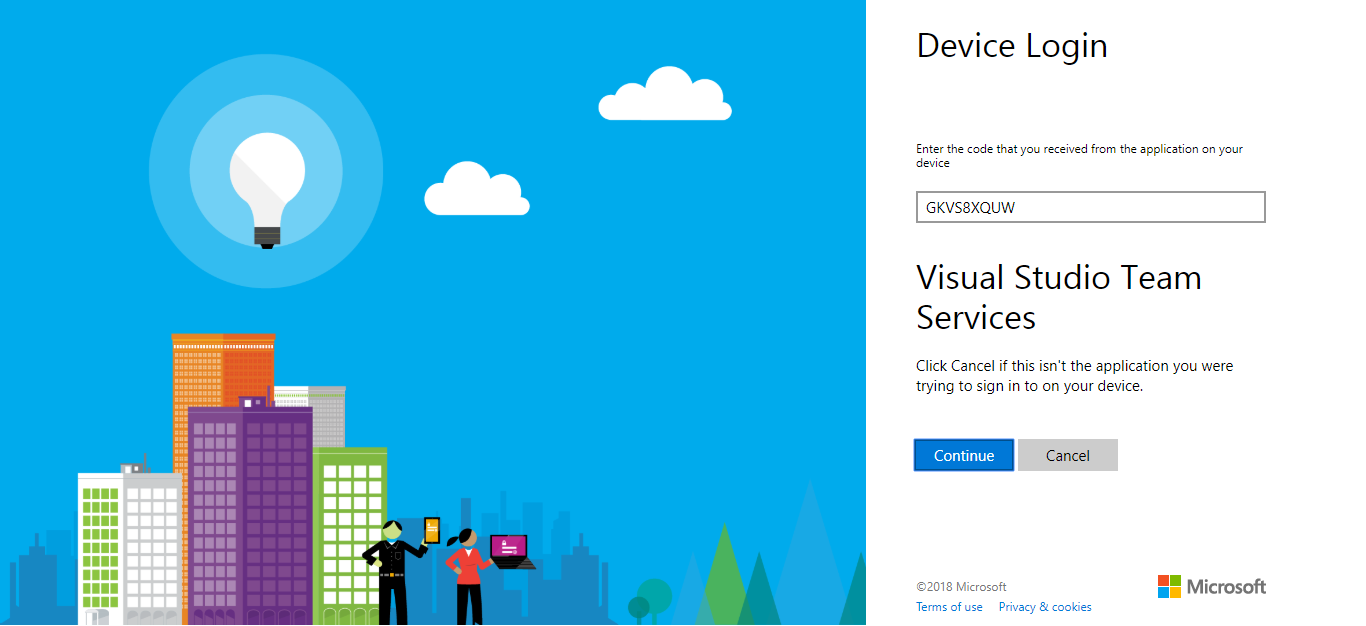
The “Follow the instructions to complete sign-in” window will pop up. Click on the hyperlink to be redirected to the Device Login page in a browser on the VM (may have a black background for security purposes).
-
Copy the code in the text field in Eclipse and paste it into the browser page, then press the “Continue” button. Then sign in with your credentials used to access Azure DevOps Services. If you get the credentials wrong you can try again by closing Eclipse, deleting ~/.microsoft/Team Explorer/4.0/*, and restarting Eclipse.
-
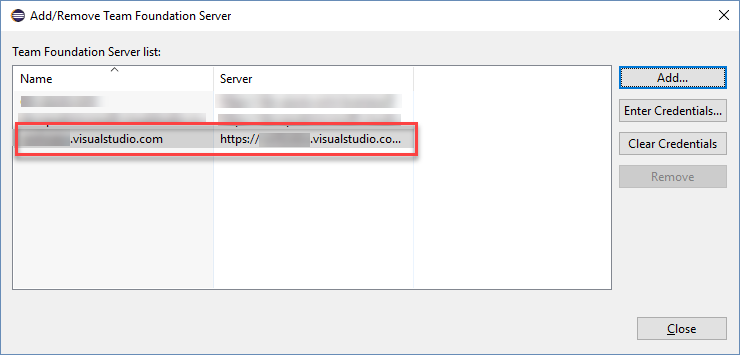
Back in Eclipse, press the OK button in the device login window. The Azure DevOps organization should now show up in the list of servers to connect to. Press the “Close” button to close the current window.
-
Choose the Team Project that you provisioned with Azure DevOps Demo Generator at the start of this lab and click Finish.
Exercise 2: Clone MyShuttle from an Azure DevOps Services Git repo using Eclipse
Next, clone the Azure Repos Git repository to a local Git repository and import the code to a project in Eclipse.
-
In the Team Explorer panel, choose Git Repositories. This will list all the Git repositories in the project.
-
Right-click the MyShuttle repo in the team project and select Import Repository


Continue with the default value for the parent directory and the repo folder name, then press the next button. This will clone the repo onto the VM.

-
We do not have any saved Eclipse projects in the repo. So, we can close the wizard now. We will import the project as a Maven project instead of Eclipse project. In the “Import Projects from Team Foundation Server” window, click the Cancel button.

-
The code has been cloned to the local repo. We can import from there. In Eclipse, choose File -> Import… to open the Import window. In the Import window, expand the Maven folder and choose Existing Maven projects. Then press the Next button.

For the root directory, click on the Browse button or type in the root directory path of “C:\Users{your-user-name}\git\MyShuttle”. The pom.xml file should appear under projects to indicate the Maven project. Additionally, click the checkbox next to Add project(s) to working set to add myshuttle to the working set to access in the Package Explorer window as a separate project. Then click the Finish button

-
Click on Window -> Show View -> Package Explorer in the toolbar at the top of Eclipse to view the myshuttle project in Eclipse in Package Explorer (You may have to minimize other windows to view the Package Explorer view)

Exercise 3: Create an Azure Pipeline to build Docker image
In this task, you will configure the Azure Pipelines build definition that will build and push the image to an Azure Container Registry.
-
Open the Azure Portal in a separate tab
-
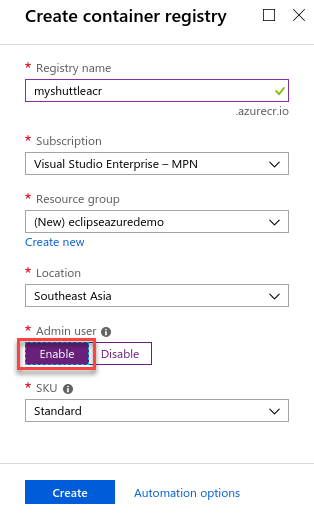
Select + Create a resource and search for Container Registry. Select Create. In the Create Container Registry dialog, enter a name for the service, create a new resource group, select location, enable Admin user, select Create.
-
Return to Azure DevOps Organization and click Pipelines –> Build hub, edit the MyShuttleDockerBuild build. This build definition contains a maven task to build the pom.xml file. In the maven task, set the following parameter values
Parameter Value Notes Options -DskipITs -settings ./maven/settings.xml Skips integration tests during the build Code Coverage Tool JaCoCo Selects JaCoCo as the coverage tool Source Files Directory src/main Sets the source files directory for JaCoCo 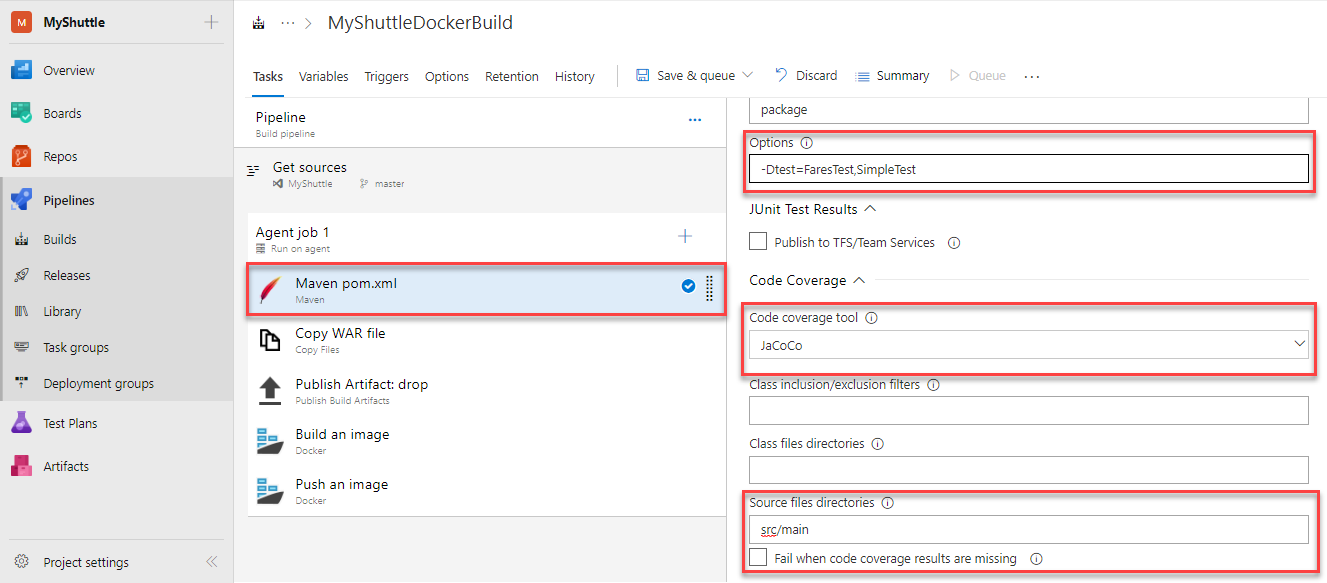
-
There is a Copy and Publish task to copy the artifacts to the staging directory and publish to Azure DevOps (or a file share).
-
Next we use the Docker Compose task to build and publish the images. The settings of the 2 Docker compose tasks - Build an image and Push an image are as follows:
Parameter Value Notes Container Registry Type Azure Container Registry This is to connect to the Azure Container Registry you created earlier Azure Subscription Your Azure subscription You need to authorize the subscription that contains your registry Azure Container Registry Your registry You need to select the Azure Container registry you created earlier Image Name Web:$(Build.BuildNumber)Sets a unique tag for each instance of the build Include Latest Tag Check (set to true) Adds the latesttag to the images produced by this build -
Click the “Save and Queue” button to save and queue this build. Make sure you are using the Hosted Ubuntu 1604 agent.
-
The build will push the image to the Azure Container Registry we created earlier.
-
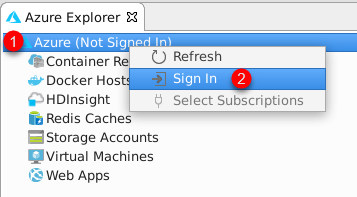
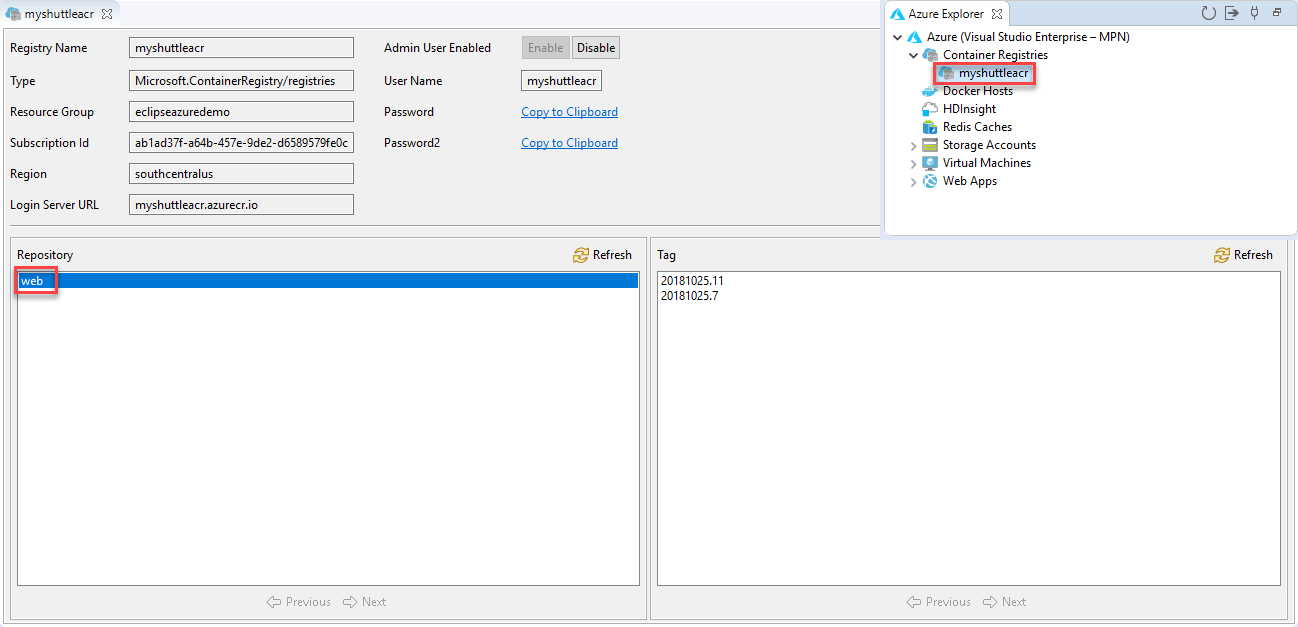
We can verify if the images were pushed correctly from the Azure Explorer view within Eclipse. Select Windows > Show View and select Other…. Search for Azure Explorer, select and click Open. Right click to Sign in to Azure and then refresh Azure Container Registry. Right click and select Open ACR Explorer. You should see the image - tagged with the build number.
Exercise 4: Deploying to an Azure Web App for containers
In this exercise, we will setup a Release pipeline to deploy the web application to an Azure web app. First, let’s create the Web App
-
Sign into your Azure Portal.
-
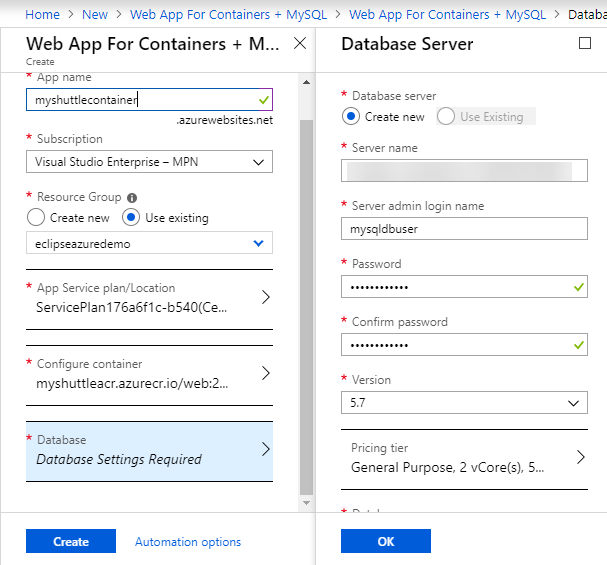
In the Azure Portal, choose + Create a resource, search for Web App for Containers + MYSQL, select and click Create.

-
Provide the following details-
- Enter a name for the new web app
- Choose the Azure subscription
- Select existing or create new resource group for the web app.
- Leave the App Service plan/Location as it is.
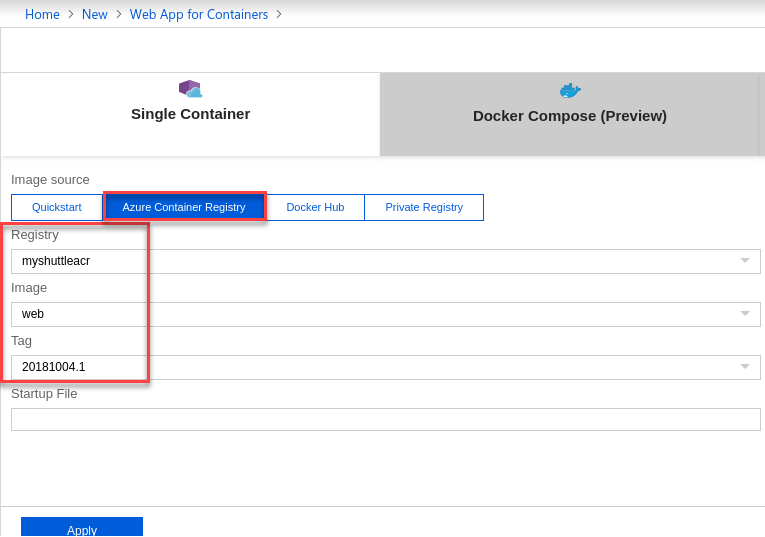
- In the Configure Container option, select Azure Container Registry. Select the Registry, Image and Tag from the respective drop-downs and click Apply.
- In the Database section, provide all the required mandatory information and note down Server Name, Server admin login name, Password in a notepad. We will use it later in the Deployment pipeline.
-
Once the provisioning is complete, go to the web app properties page, and select the URL to browse the web app. You should see the default Tomcat page.
-
Append /myshuttledev to the web application context path in the URL to get to the MyShuttle login page. For example if your web app URL is
https://myshuttle-azure.azurewebsites.net/, then your URL to the login page ishttps://myshuttle-azure.azurewebsites.net/myshuttledev/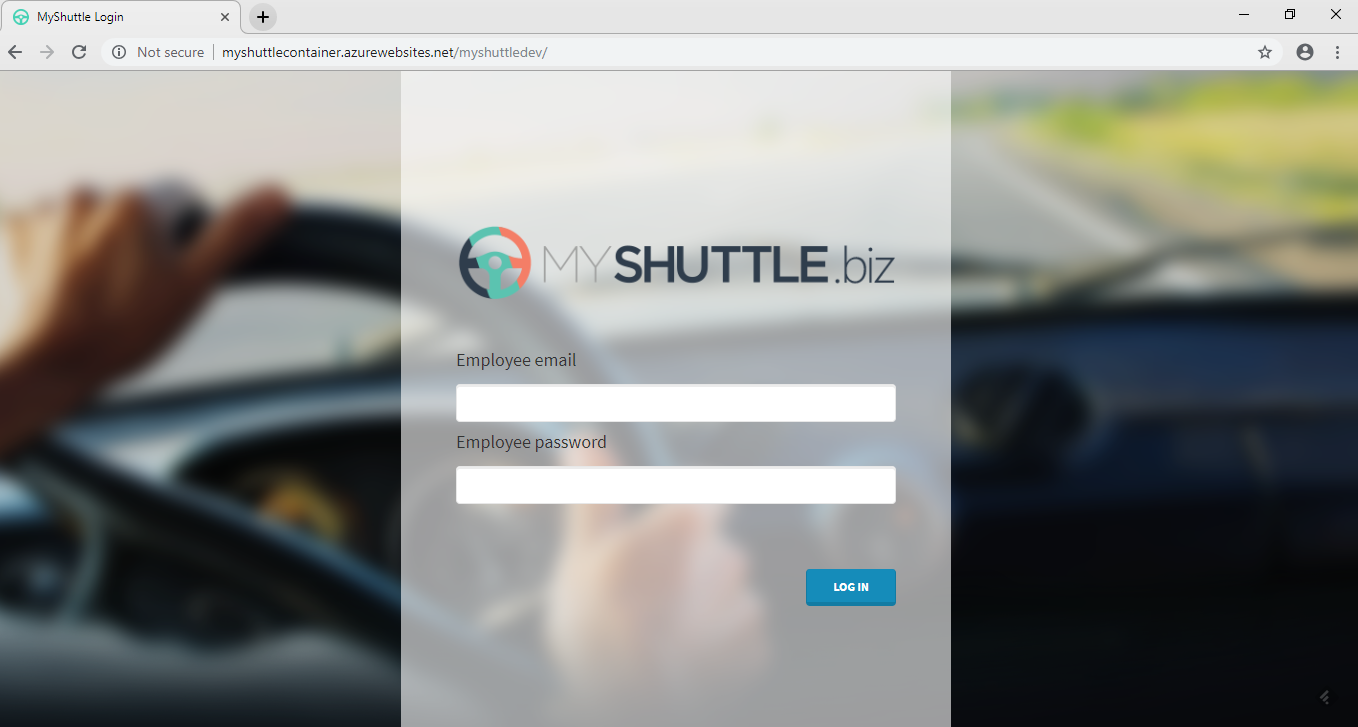
We could configure Continuous Deployment to deploy the web app when a new image is pushed to the registry, within the Azure portal itself. However, setting up an Azure Pipeline will provide more flexibility and additional controls (approvals, release gates, etc.) for application deployment.
-
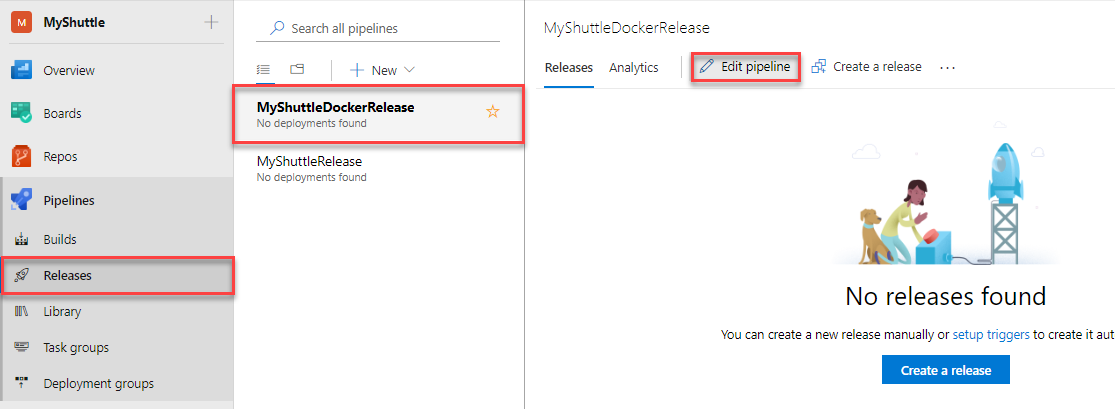
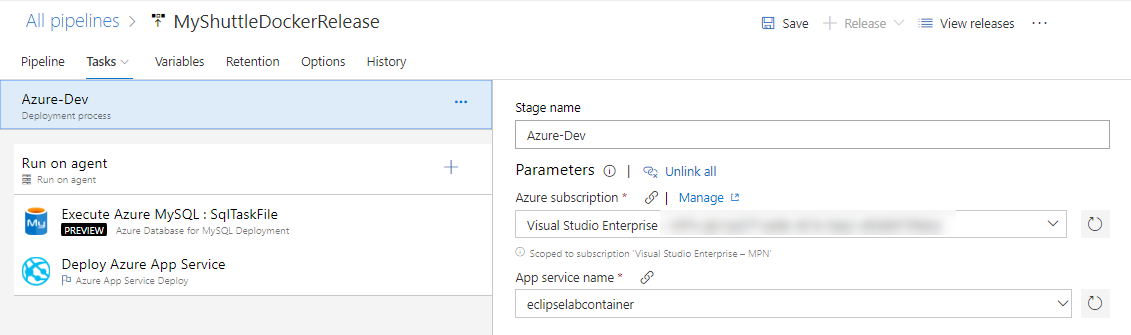
Back in Azure DevOps account, select Releases from the Pipelines hub. Select the Release definition MyShuttleDockerRelease and click Edit Pipeline.
-
Hover the mouse on Tasks and select Azure-Dev. Configure the environment as below -
- Pick the Azure subscription and click Authorize to authorize the credentials
- Enter the App Service that you created
-
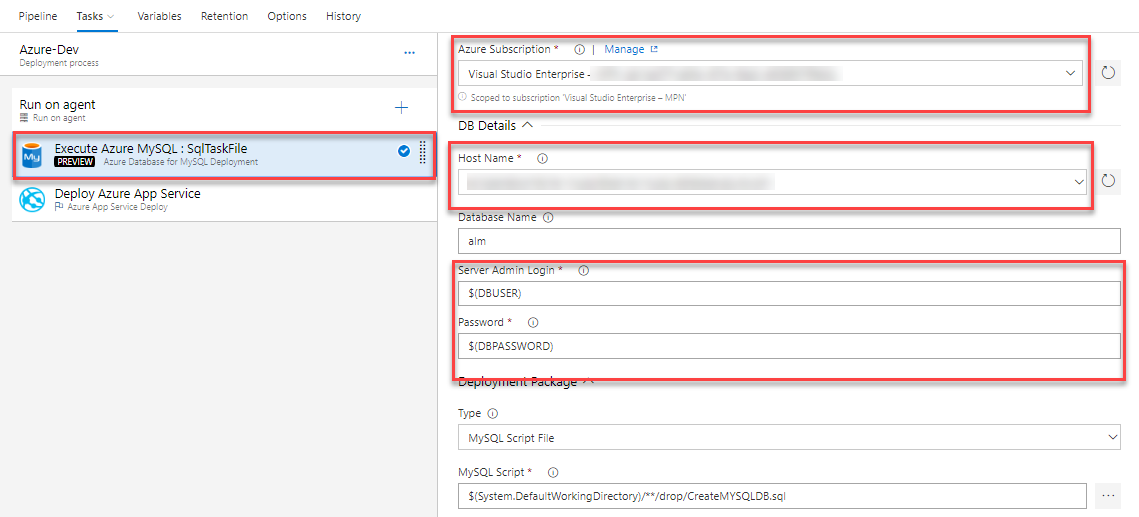
Select the Execute Azure MYSQL:SqlTaskFile task, choose the Azure subscription, and provide the DB details which were noted down earlier during the creation of the database server.
- Select the Host Name from the drop down.
- A version controlled MYSQL script is provided here which creates the required database alm, tables and finally, populate records.
-
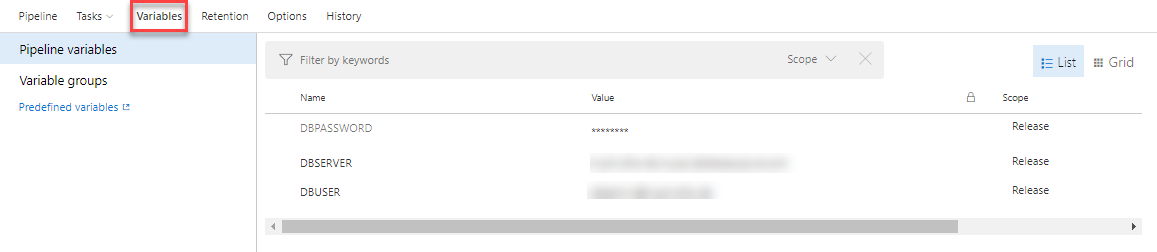
For the parameters - $(DBUSER) and $(DBPASSWORD), click the Variables section and enter the corresponding values -
- $(DBUSER) corresponds to the SERVER ADMIN LOGIN NAME value in the Properties section of the created MYSQL server in Azure Portal.
- $(DBPASSWORD) corresponds to the Password provided during the creation of the MYSQL server in Azure Portal.
-
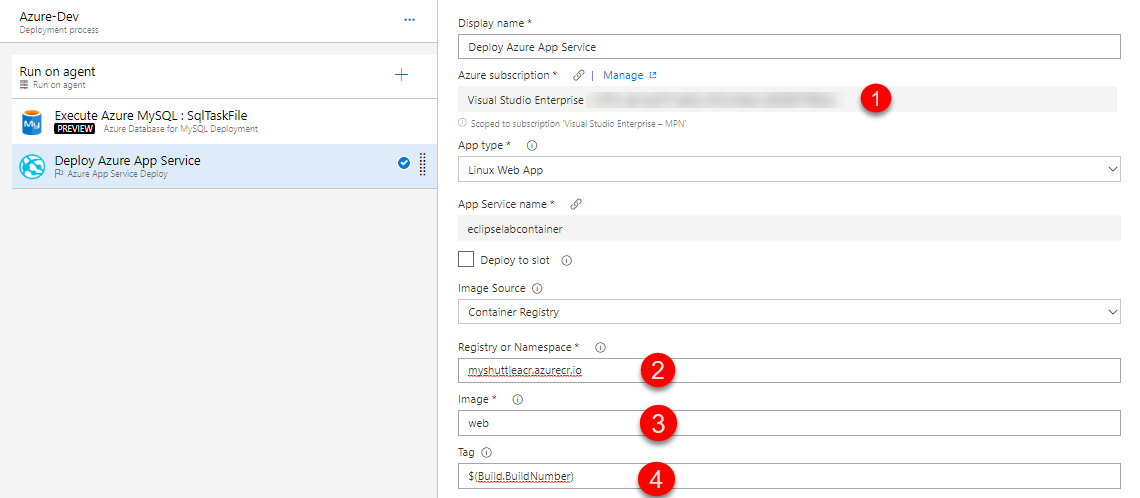
Select the Deploy Azure App Service task and make sure that the following values are provided. Note that the task allows you to specify the Tag that you want to pull. This will allow you to achieve end-to-end traceability from code to deployment by using a build-specific tag for each deployment. For example, with the Docker build tasks you can tag your images with the Build.Number for each deployment.
- Azure Subscription - Choose the correct Azure subscription from drop down.
- Registry or Namespace - Provide the value of Login server of the created Container Registry. You will find it in the Overview section.
- Image - Provide the value as web. This is where the container image is stored after build.
- Tag - Provide the value as $(Build.BuildNumber).
-
Select Save and then click + Release | Create Release.
-
Check the artifact version you want to use and then select Create.
-
Wait for the release is complete and then navigate to the URL
http://{your web app name}.azurewebsites.net/myshuttledev. You should be able to see the login page.
Exercise 5: Configuring MySQL connection strings in the Web App
-
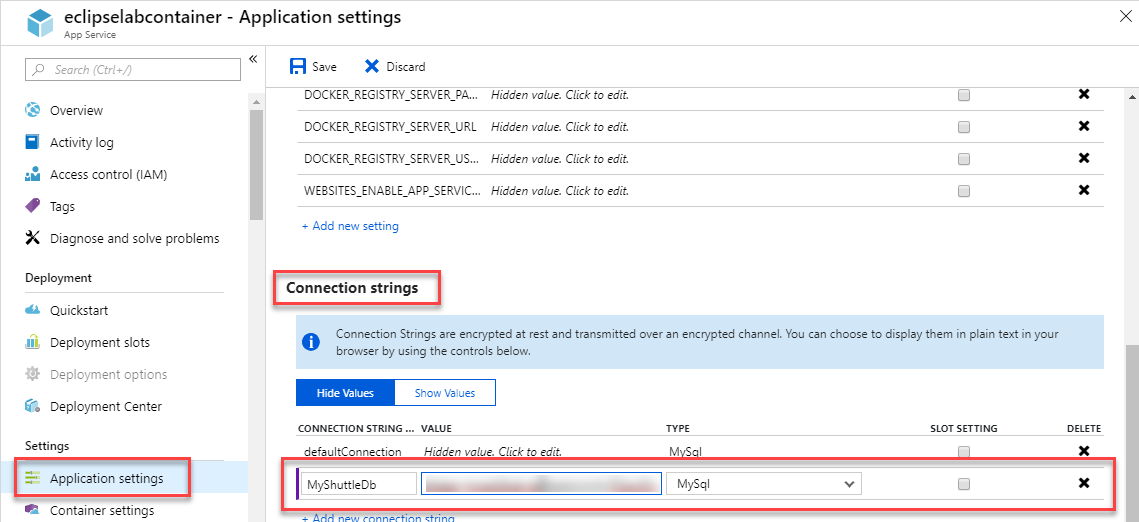
From the Azure portal, select the Web app you provisioned. Select Application Settings and scroll down to the Connection Strings section.
-
Click + Add new connection string, change the type to MySQL, name as MyShuttleDb and paste the following string for the value and replace MySQL Server Name, your user name and your password with the appropriate values -
jdbc:mysql://{MySQL Server Name}:3306/alm?useSSL=true&requireSSL=false&autoReconnect=true&user={your user name}&password={your password}- MySQL Server Name : Value that you copied previously from the MySQL server Properties.
- your user name : Value that you copied previously from the MySQL server Properties.
-
your password : Value that you provided during the creation of MYSQL database server in the Deploy to Azure phase.
-
Click on Save to save the connection string.
-
You should be able to login to the application now. Return to the login page and try logging in using any of the below username/password combination:
- fred/fredpassword
- wilma/wilmapassword
- betty/bettypassword
Next: End to End workflow with Eclipse
In the next part of the lab, you are going to see a typical end-to-end workflow for a Java developer using Eclipse. The version that you just deployed has an issue. Assuming the issue has been reported, you will go test it, file a bug, then find the cause and fix the bug.
Continue to Part 2: End to End workflow with Eclipse